


#1: Salted Hazelnut Brownies
Gluten-free if you want them to be

Welcome to The Kitchen Club! I’m so excited to have you guys with me for our first recipe. Your subscription to The Kitchen Club helps these recipes get developed, tested, and sent out to you. Thank you!
If you enjoy today’s newsletter and know someone else that would too (or maybe you know someone that really needs help cooking) be an awesome friend and give them a gift subscription!

To say I have eaten a lot of brownies in the past month is a gross understatement. I have consumed more brownies than anyone should consume in a year. Seriously. Rarely did I sit down with a whole brownie and enjoy it. Instead, I ate numerous teeny tiny bites and put together they equal a ton of delicious brownies.
Like most of my recipes, these Salted Hazelnut Brownies were born out of a craving. The beautiful combination of chocolate and hazelnut is something I have been a fan of all my life. The little gold-wrapped Ferrero Rocher balls were my favorite treat to hoard and sneak at night in my bedroom. I don’t buy Nutella or even the healthy Justin’s version because I will eat it all with no restraint. So while craving brownies one day, hazelnuts were a natural addition.
I wanted two forms of hazelnut with these brownies⏤chopped nuts for texture and crunch and creamy swirls of hazelnut butter. The brownie itself is rich, dense, and fudgy (the way brownies should be) and is laced with hazelnuts and chocolate chunks. Big fat chocolate chunks that create ooey gooey puddles of chocolate while warm. Bonus to this recipe: it can be made with or without gluten!
Most of my gluten-free recipes start out as normal gluten-filled recipes that get tweaked and adapted to work with a 1-to-1 GF flour blend. In this case, I already had a killer GF brownie recipe and I hopped in the kitchen to test it with regular AP flour. It worked pretty flawlessly and in a side-by-side test they were almost identical. The only difference I noticed is that the gluten-free stay moister for longer. After a day or two, the ones baked with AP flour dried out a tad, which is normal. One of our neighbors did a thorough taste test and he favorited the gluten-free batch a little more! Either way you make them, they won’t disappoint!
An important note about GF flour substitutes: Gluten-free baking flour substitutes are specifically calculated blends to mimic the texture and rise of normal flour. To make an equal swap you need a GF blend for baking. The question of substituting almond flour for all-purpose flour comes up a lot. You can not make that substitution and expect similar results because almond flour is simply ground almonds. That's it. This applies to rice flour, cassava flour, chickpea flour, oat flour etc. In a blend you will find a combination of ground grains, starches, and usually xanthan gum. Xanthan gum helps mimic the chew that gluten would give a baked item. Something else to keep in mind is that each GF baking flour blend will give you a different result. Cup4Cup is an excellent blend but contains milk powder ruling out the option of using it for people that are both gluten free and dairy free. My ride or die is Bob’s Red Mill 1-to-1 GF Baking flour. It is one of the few that my sweet husband Marco can eat but it also produces excellent results. My GF recipes are tested with this flour. If you have another brand you enjoy you may need to make slight adjustments to the recipe.

Let’s Talk About Pans
Before I even started my brownie testing I ran into my first problem, I didn’t have a square pan. Well, I do have a single glass square dish wedged in the very back of my cabinet but I never use it for baking. I prefer to do my baking in light metal (aluminum) pans. Here’s why:
Glass is an insulator. It is slow to heat up and once it gets hot it retains heat for a long time. This can cause uneven baking and the outside to get too dark and dry out.
Aluminum is a conductor, heats up fast, and helps produce evenly browned edges.
Glass is heavy, metal is light.
Metal pans have right angles where the sides meet the bottom. Glass pans have slightly rounded angles and I find them less attractive. Purely an aesthetic preference but details are important to me.
Glass pan dimensions can vary. I have run into 8x8 pans where the bottom is really 6x6. Or 8x8 pans that fan out and the top measures 8.5x8.5. This totally affects your end result.
So I ordered a square pan for this recipe, two actually. 9x9 and 8x8. The 9x9 was purchased on accident but I am keeping it. The first batch I made was done in a 12.8x8.5 tart pan. When I realized I didn’t have an 8x8 square that was the closest metal pan I had and I actually liked it! The pros were the beautifully scalloped edges, a nice detail, and they were easy to remove with the removable bottom. Cons were a little batter leaked under the removable bottom and the extra length made the brownies thin. Marco and I both didn’t mind the thin brownie but it was a whole other vibe than what I wanted to achieve with this recipe.

Cakey vs. Fudgy
The original GF recipe I had, and liked, produced an excellent cakey brownie. Gluten-free baking is so hard that I usually have the mindset of “when you get something good just take it and run.” Well, I didn’t want cakey, I wanted fudgy and I had to figure it out. The fudginess in a brownie all comes down to the fat vs. flour ratio. More fat = fudgier. These are the tweaks I made:
Egg Yolks
This recipe calls for two eggs plus two yolks. We all know egg whites to be lean and the yolks to be fattier. Egg whites in baking can help with structure and rise while yolks add fat, richness, and emulsifying properties. This extra emulsification of fat and water leads to extra moisture in baked goods and that moisture creates a moist tender crumb and extra richness. We want tender rich brownies!
Melted Chocolate
My original recipe called for cocoa powder. Just cocoa powder AND it was unbloomed! This wasn’t an issue and they were still chocolatey as hell but by adding melted chocolate to the batter, we add more fat that helps with the fudgy texture. I scaled back the cocoa powder, but didn’t eliminate it completely, and added 226g (8oz) of chopped chocolate to the recipe. Half gets melted in and half is added as chunks. If you don’t want any chunks, then you will only need 113g (4oz) of chopped chocolate but trust me you want chunks. When warm they are little surprise puddles and when cooled they add nice textured pieces of chocolate to every bite.
Brown Sugar
Refined brown sugar is just white granulated sugar with the addition of molasses. Molasses in baked goods adds a caramel flavor, a darker color, and extra chew. Although subtle, molasses compliments chocolate really well and I’m a big fan of the flavors together. With most GF recipes that need a chewier texture, I start by tweaking the sugars. This brownie recipe calls for dark brown sugar. You can use light brown sugar but light brown sugar has less molasses than dark brown sugar. It won’t ruin the batch but you could have a slightly different result.
Let’s Talk Hazelnuts
Hazelnuts from the grocery store usually come raw with their brown skin on. That skin is really bitter and it’s best to remove it before using your nuts. The way I like to do it is to bake the nuts for 15-20 minutes at 350°. Transfer them to a clean dishtowel, one that can get dirty, and rub the hot nuts in the towel. As the nuts hit each other and you rub them, the skins will fall right off. If I have any extra stubborn ones I will pop them in the oven for a few extra minutes and try again. You don’t have to get every last brown spot off but the more you get off the better. The bonus to this is you also toast the nuts enhancing their flavor.
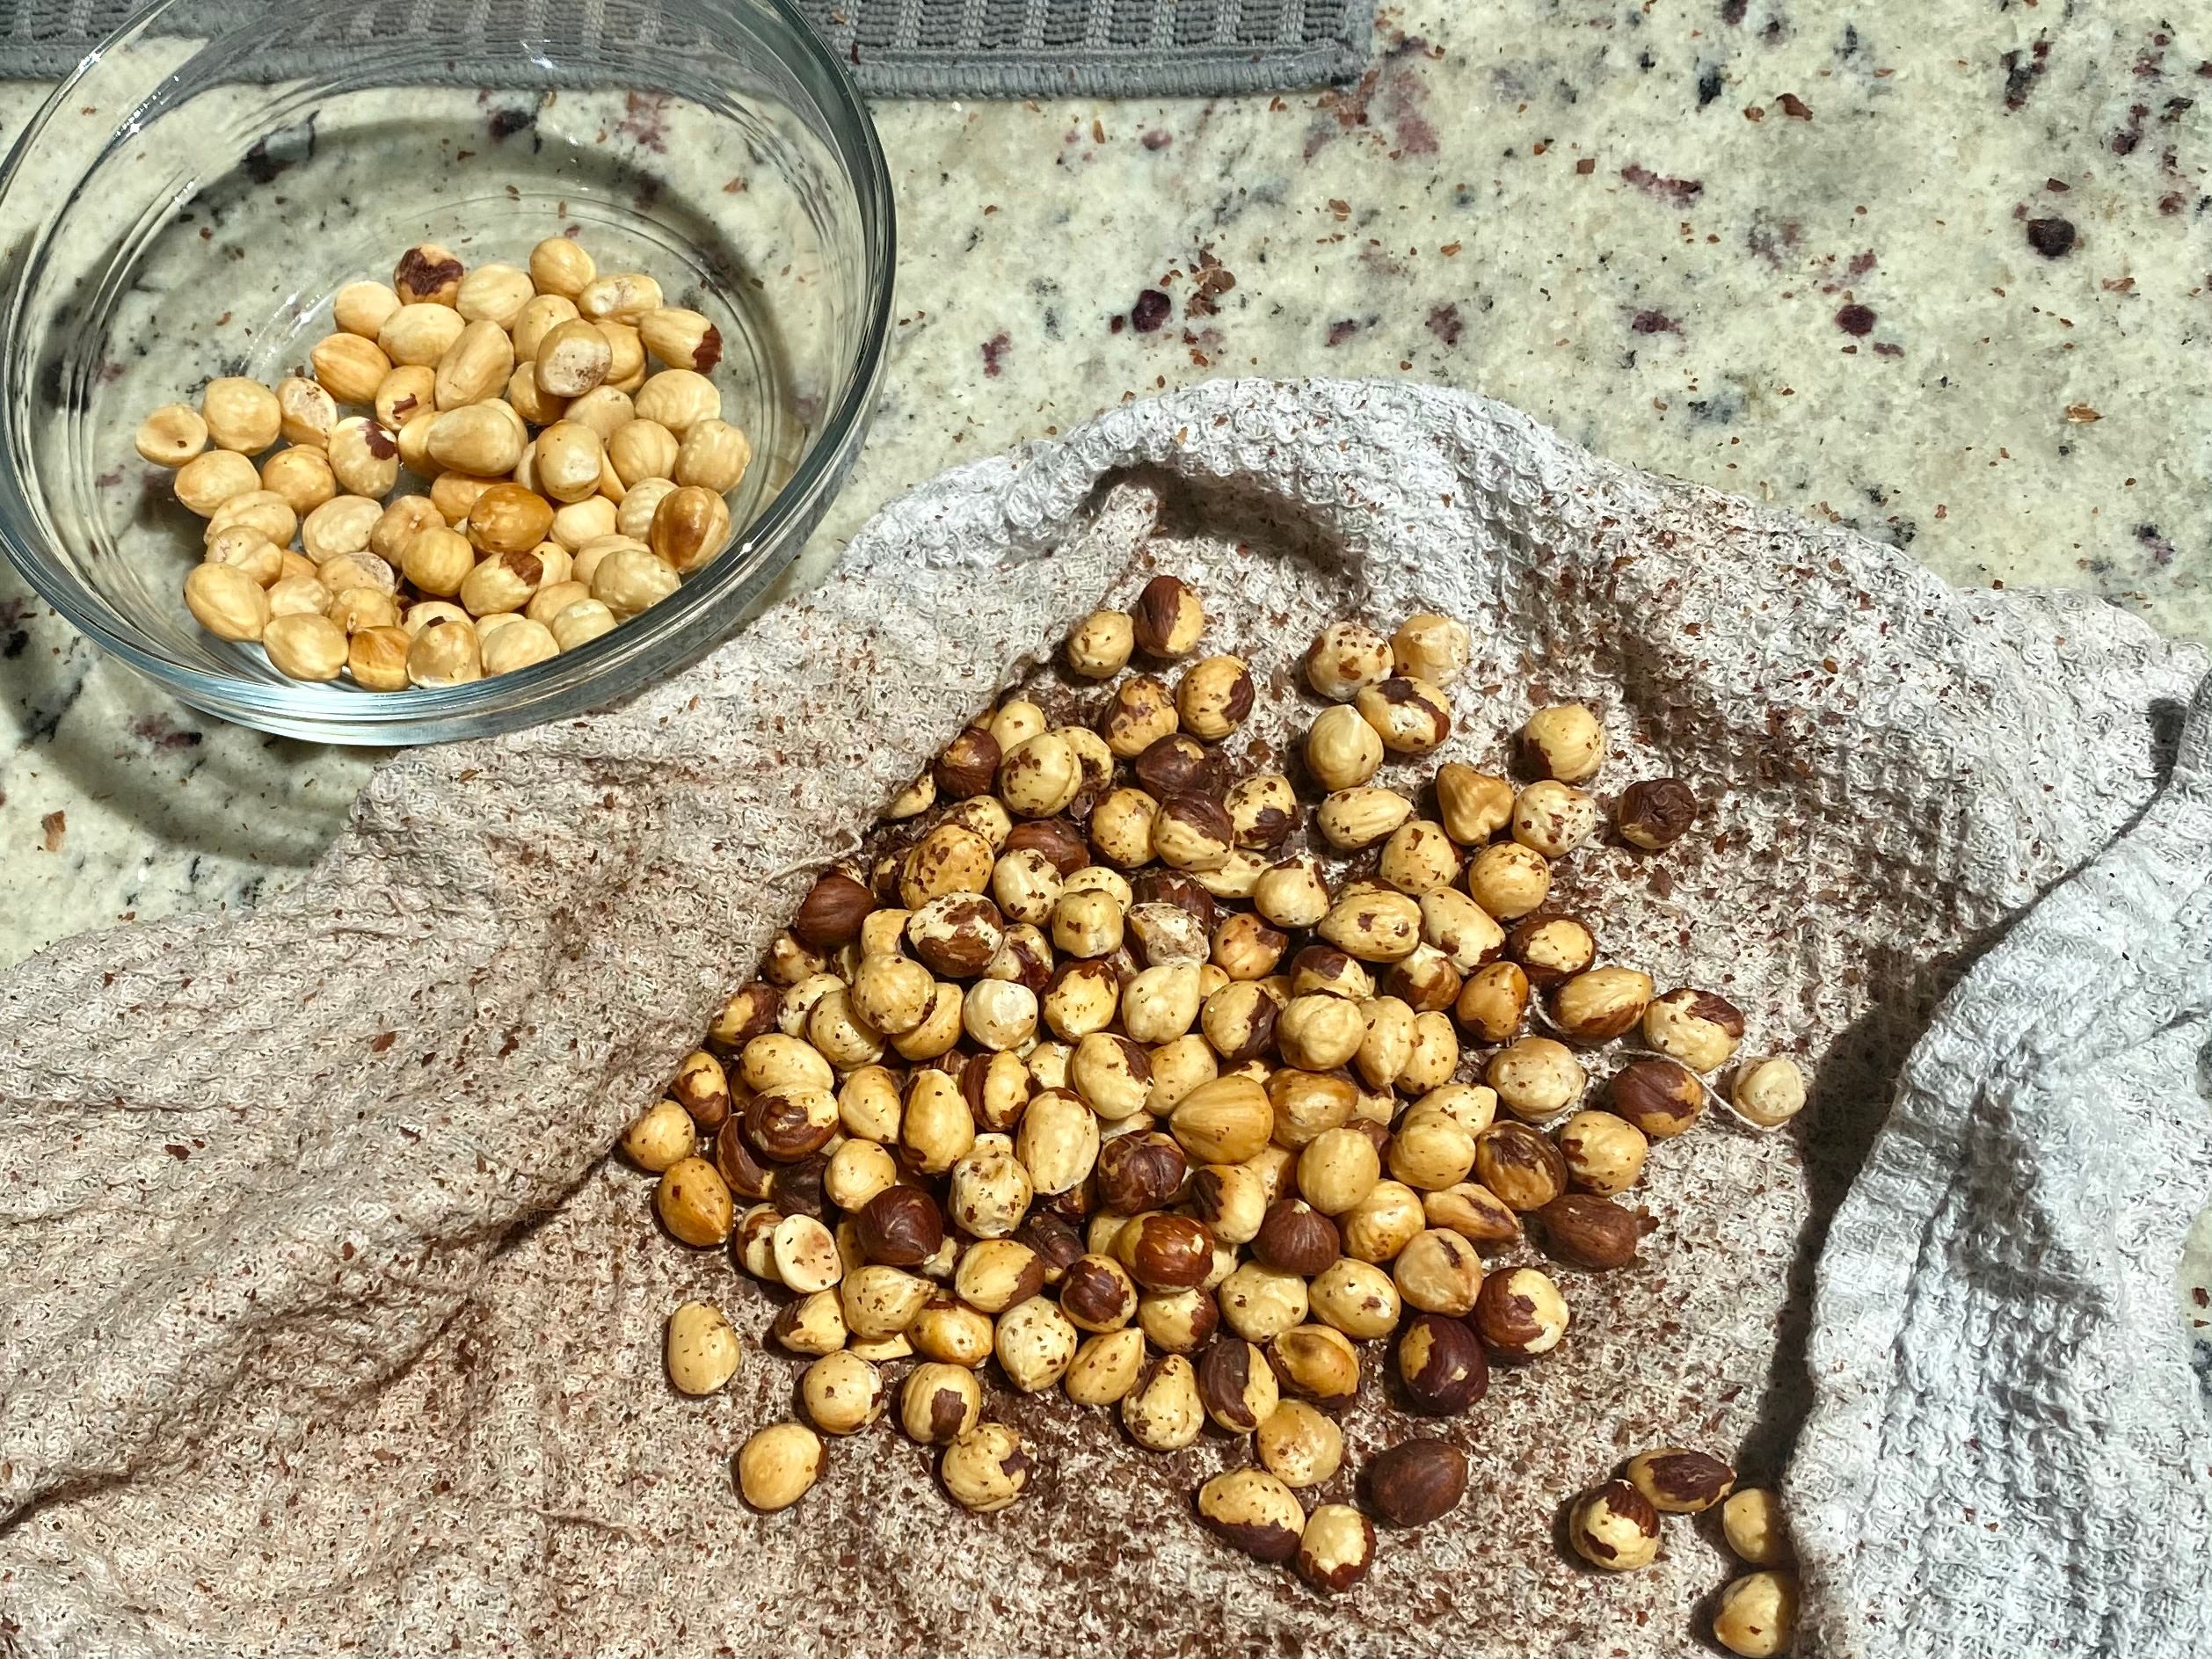
If you are so lucky to find a bag of hazelnuts without their skins at the grocery store, big win! You can skip the peeling step. I do however recommend giving them a light toast until they have a little golden color and are fragrant, even if they say they are toasted.
Could you substitute another nut in place of the hazelnuts in this recipe? Absolutely! Could you skip the nuts completely and make plain brownies? You bet!
Prep Your Pan
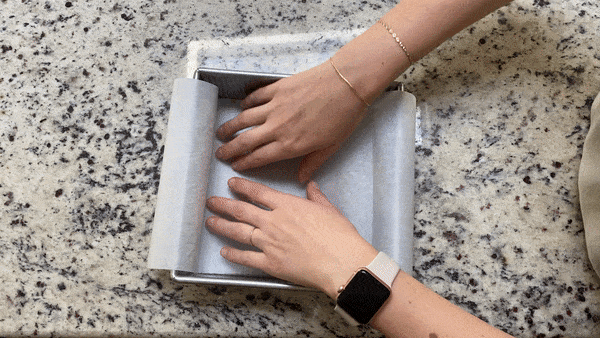
We have already agreed we are using an 8x8 metal pan, right? Before we start any cooking we need to prep that pan. I like to cut two 8 inch strips of parchment paper, lightly oil the pan with vegetable oil, and lay one strip in the pan and the other going across it. Press the parchment into the corners and it should stay in place with help from the oil but I also use metal binder clips to hold them in place.

Click here to download + print.
Salted Hazelnut Brownies
170g Hazelnuts, toasted and skins removed
1t Sugar
¼ t Kosher salt
142g Butter
226g Bittersweet chocolate, chopped *divided
150g Granulated sugar
150g Dark brown sugar
2 Eggs
2 Egg yolks
1T Vanilla extract
30g Cocoa powder
½ t Baking powder
1t Kosher salt
110g AP Flour OR Bob’s Red Mill Gluten Free 1-to-1 Baking Flour
Toast + Remove The Hazelnut Skins
In a 350 degree oven, bake hazelnuts on a sheet tray for 15-20 minutes. The skins should start to crack and you will smell a toasty aroma.
Transfer hot nuts to a clean dish towel (one that can get dirty) and rub the nuts between the towel. As the nuts hit each other, and you rub, the skins will start to fall off. It is okay if you do not get every last brown piece off but the skin is bitter so try to remove as much as you can.
Chop The Nuts + Make Hazelnut Butter
Add toasted and peeled hazelnuts to a food processor. Pulse the nuts 10 times to roughly chop. Remove half the nuts and hold to add in later.
With the remaining half, turn the processor on and let it run for 2-3 minutes until smooth. Scrape down the sides, add 1t sugar and ¼ t kosher salt, and run for 30 seconds.
Transfer hazelnut butter to a bowl and save for later.
Make The Brownie Batter
Preheat your oven to 350 degrees.
Roughly chop bittersweet chocolate. Reserve half and set aside to add in later. Big chunks are okay here but keep them around 1/2 inch. Continue to chop the other half until chocolate is chopped into small pieces and place in a large bowl.
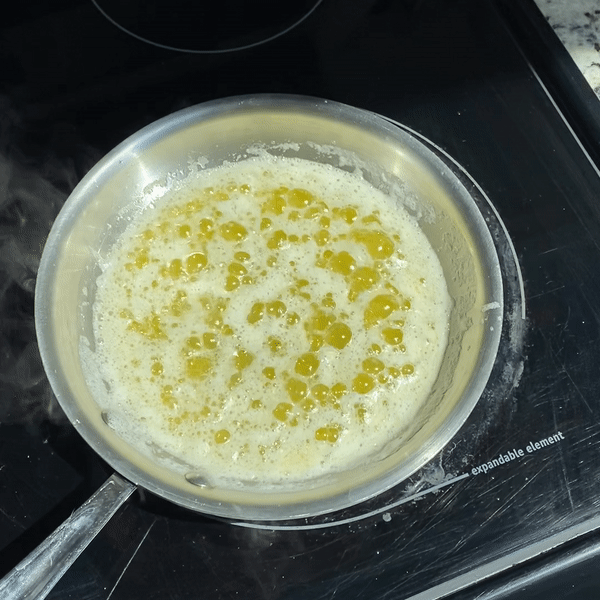
Add butter to a small frying pan and melt over medium heat. Continue to cook the butter until it browns. First, the butter will rapidly bubble. Once the moisture has evaporated it will foam and then pick up color. Watch closely and stir often to prevent the milk solids from burning. Take it until evenly brown, just past golden, with a nutty aroma present. Immediately pour hot brown butter over the chopped chocolate in your large bowl. Let sit for three minutes.

After a few minutes, the chocolate should be melted. Give it a light whisk to emulsify. In a steady stream, pour your sugar into the melted chocolate while whisking to combine. Add granulated sugar followed by dark brown sugar.
Whisk in eggs, yolks, and vanilla extract. Adding them one at a time and whisking to combine.
Switching to a spatula, fold in cocoa powder, baking powder, and salt. Add GF or AP flour and fold until incorporated and there are no more dry streaks. Add reserved chopped chocolate and chopped hazelnuts. Fold to incorporate.
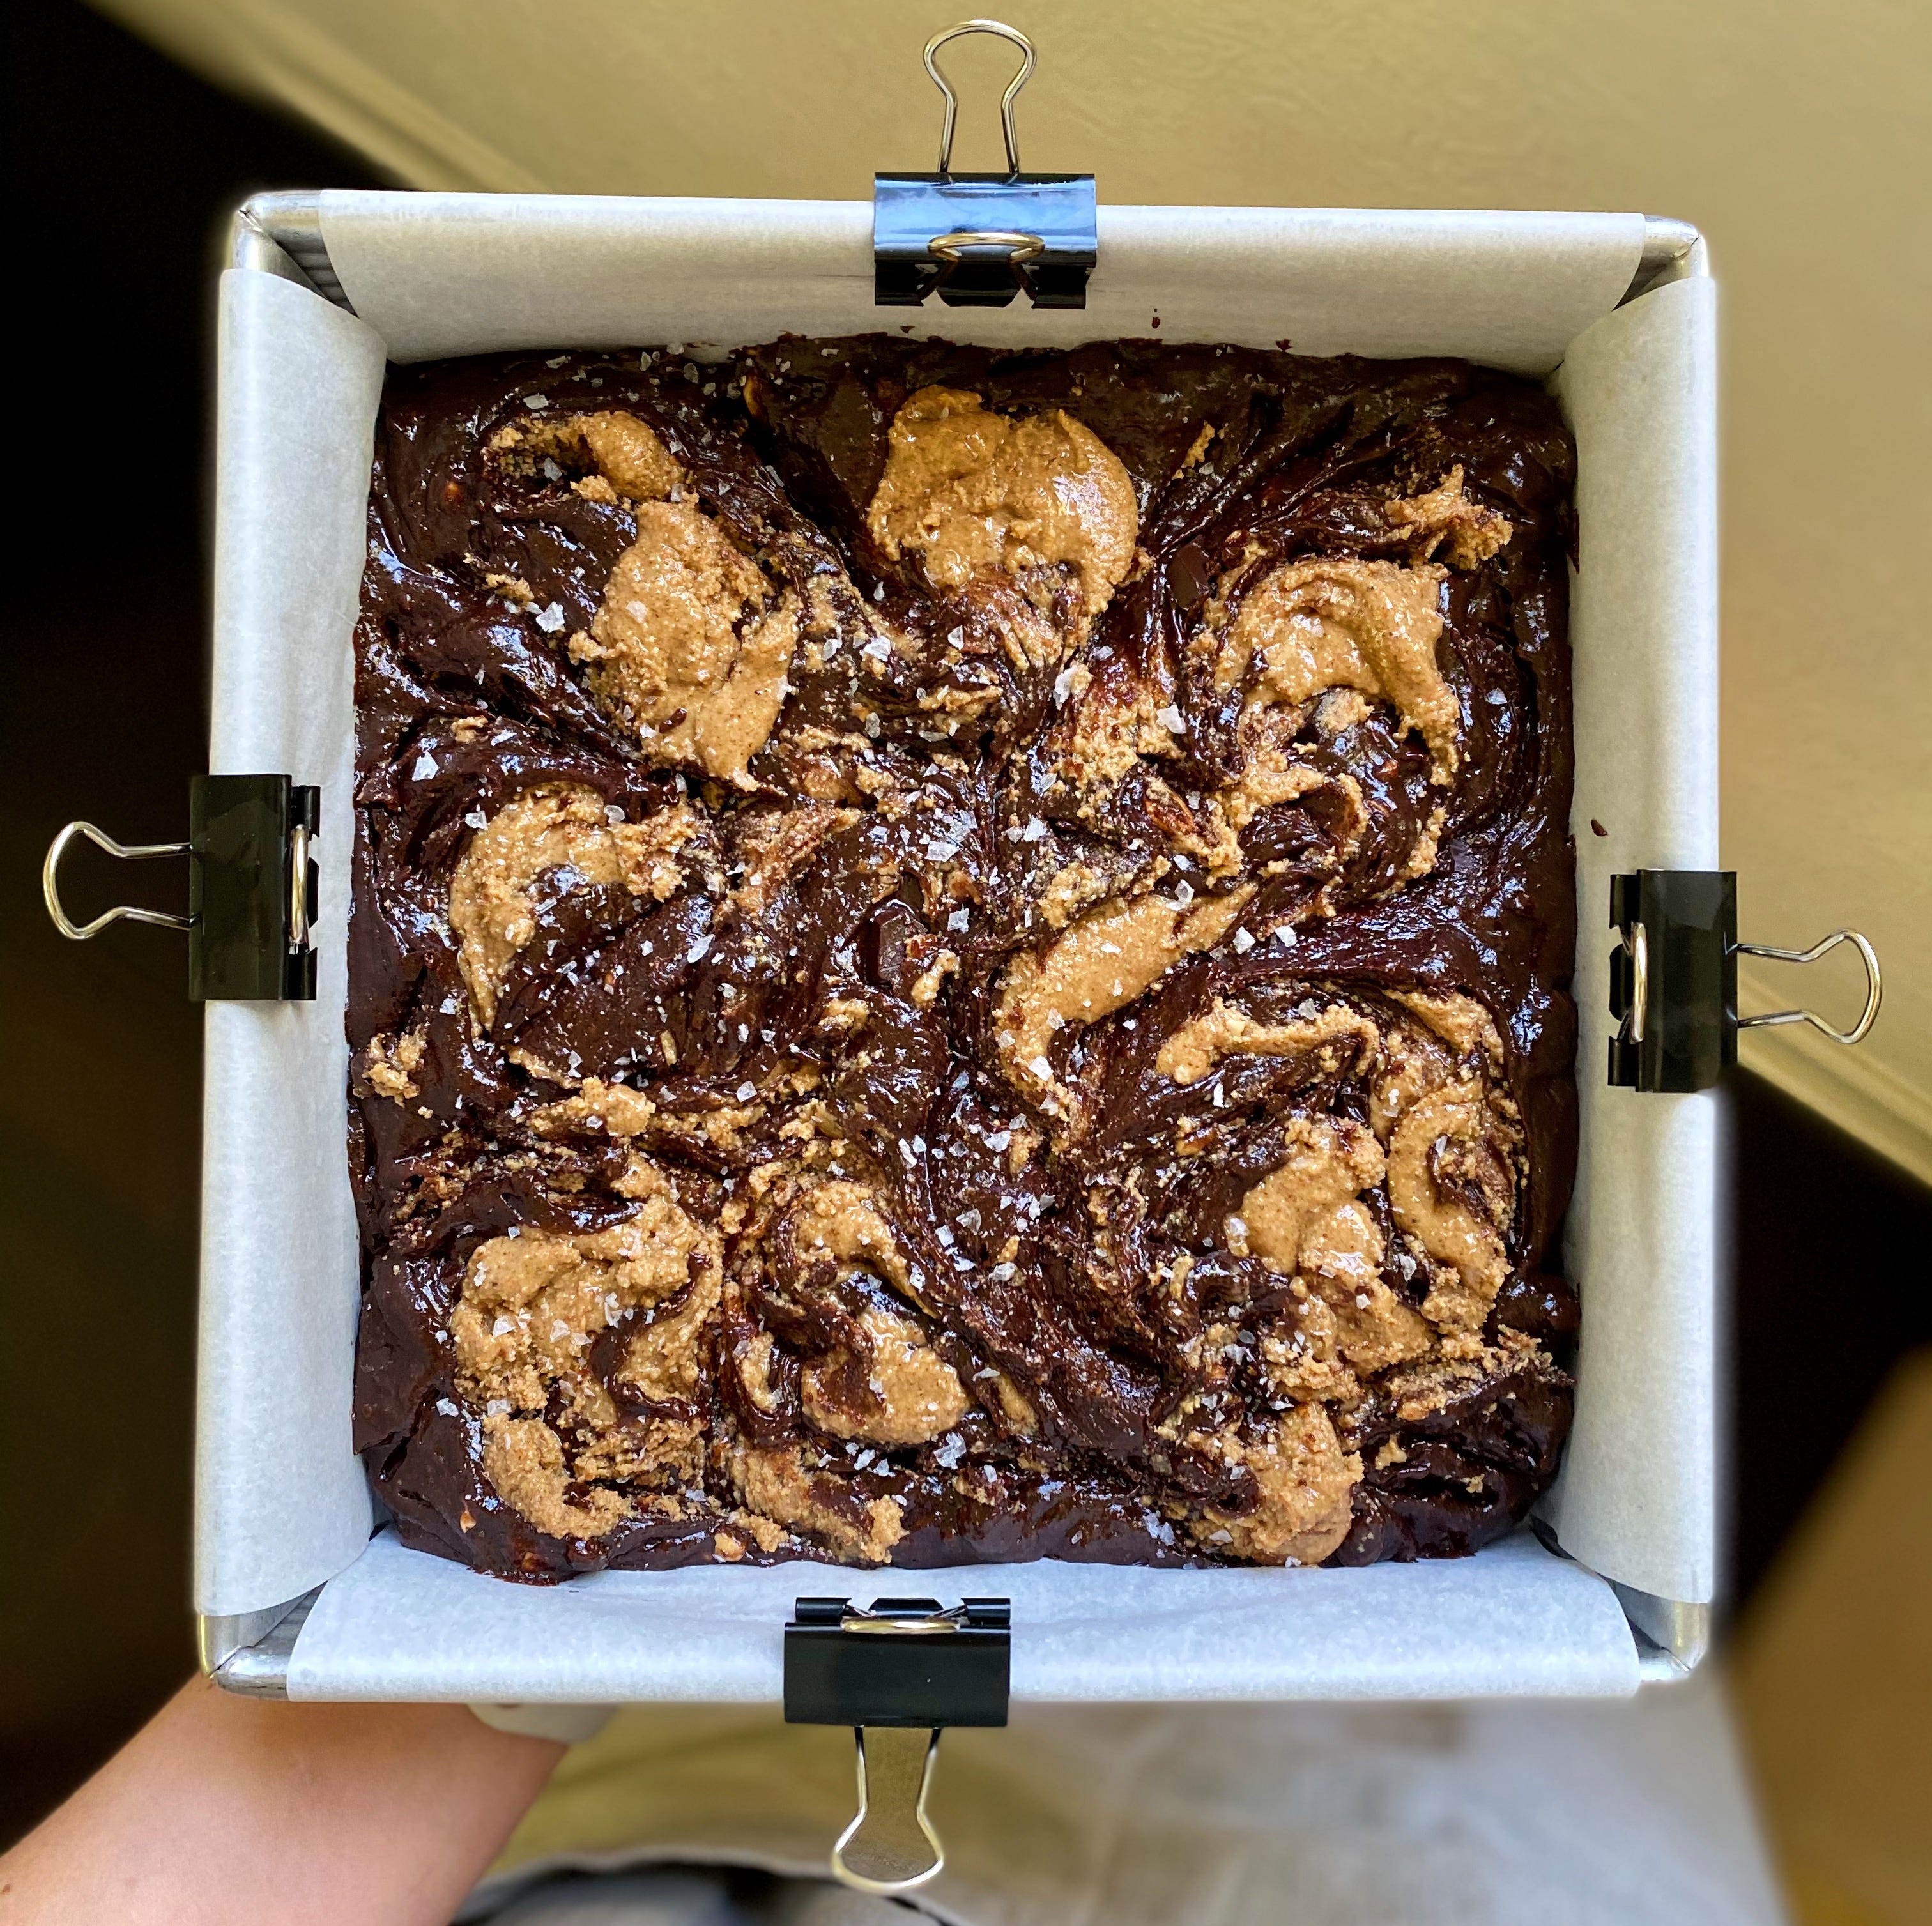
Pour batter into an 8x8 tin lined with parchment paper. Spoon 5 scoops of hazelnut butter over the top. Using a paring knife swirl hazelnut butter into the brownie batter. Sprinkle with a generous pinch of flakey salt to finish. *Bonus points if you sprinkle some extra hazelnuts over the top too!

Bake brownies for 35 minutes. A cake tester will come out clean BUT if you poke a big puddle of chocolate it won’t. Let brownies cool for at least 60 minutes before slicing into them!
There are no rules in The Kitchen Club BUT I have two requests:
Please send me pictures and tell me how the recipe turns out for you! Nothing makes me happier than hearing from you guys when you try a recipe.
Reach out if you need help. I love being able to problem solve and help you guys in the kitchen. Leave a comment on this post, because others may have the same question, and I’ll get back to you ASAP.
Have fun baking!! Love you, meant it! M
These look amazing! Can you use another nut butter or even Nutella instead of making the nut butter yourself? Xo, Lazy
I’ll be going to the market today for any ingredients I don’t have.